How to Fix Microsoft MoUSO Core Worker Process – Quick Steps?
For the computer’s OS to function effectively, Microsoft Windows employs some processes that always run in its background. One of such programs is MoUSO Core Worker Process that could consume more resources from the system. The program is working while we’re installing or checking Windows updates.
It’s notable that MoUSO Core Worker Process could automatically wake a computer from sleep. Additionally, it causes high usage of the system memory, disk, CPU, RAM, and other resources. This article gives you a clear explanation of the MoUSO Core Worker Process, what it does, how to fix it, and more. Read on to learn more.
Jump to
- What is MoUSO Core Worker Process?
- Why Does MoUSO Core Worker Restart a Computer on Sleep Mode?
- Is MoUSO Core Worker Process Safe?
- How to Check the Authenticity of MoUSO Core Worker Process
- How To Fix MoUSO Core Worker Process
- Why Does MoUSO MoUSO Core Worker Process Consume High Memory and System Resources?
- Methods to prevent MoUSO Core Worker Process from High Memory Consumption
- Conclusion
What is MoUSO Core Worker Process?
MoUSO Core Worker Process is a Windows Update Session Orchestrator (USO) responsible for managing Windows updates with the background of the OS. It is also known as the MoUSOCoreWorker exe and is usually found in the Task Manager of the OS. Microsoft included the MoUSOCoreWorker exe in version 1903 of Windows 10.
In its function, the MoUSO Core Worker Process coordinates the installation of Windows updates and checks. The process completes its operation with the Windows background without interfering with the normal usage of the system. Windows requires the running of MoUSOCoreWorker exe in the background to ensure the protection of the system against most system threats.
Despite its background functionality, there are cases where the MoUSO Core Worker Process consumes a higher memory of the computer. These are strictly due to errors that could occur during processes of updates, downloads, and installations.
Besides MoUSOCoreWorker exe, other executable files run in the system background during updates. Their operations are based on the Dynamic Link Library (DLL). They include:
- dll
- exe
- exe
- dll
- dll
Why Does MoUSO Core Worker Restart a Computer on Sleep Mode?
MoUSO Core Worker Process will restart a computer on sleep mode as it tries to access the system’s update status. Since the process manages the system updates in the background, it will want to try to do so even while the computer sleeps. Once it can’t find the update status, it will wake the sleeping system and cause it to start running again.
Usually, when you put your computer to sleep mode, the system update will automatically stop. Where there are still uncompleted updates, they will queue waiting for the system’s normal operation to install.
However, after a long queuing period, MoUSO Core Worker Process steps in to complete the pending installations. It will take over the system resources and power it, thereby restarting a computer from its sleep mode.
Read Also: How To Install Stick Nodes Stickman Animator on Windows 10
Is MoUSO Core Worker Process Safe?
MoUSOCoreWorker exe is an update file that Windows introduced for checking system update status. It manages update installations and will operate to secure the system against possible threats.
However, some malware developers are recently creating and naming their processes the same as that from Windows. Such fake processes could pose huge threats to the entire OS of the computer. Hence, it’s important that you check the authenticity of the process running on your system.
How to Check the Authenticity of MoUSO Core Worker Process
Scanning with Windows Security (Defender)
Most recent Windows versions include Windows Security, which could easily scan .exe files. Right-click on the file if seen on your desktop and select the option to Scan with Microsoft Defender.

Where the file is in your task manager, right-click on it, choosing Open file location. This will allow you to identify the location of the file on your system. Then, right-click again on the highlighted file and click scan. Once it’s marked ‘Safe,’ it means it poses no threat to your computer. But if otherwise, it is better you delete the file.
Activate the File in Windows Sandbox

Recent versions of Windows 10 and 11 are designed with free Sandbox. This feature is very helpful in running applications and files in a protected setting for confirming their authenticity. From your Windows search box, search for Windows Sandbox. Copy and paste the file into the Sandbox and click the run button.
Confirm the Publisher
You can check the file’s publisher to confirm its authenticity. Right-click on the file to check for its properties. This displays the publisher. The safety of the file is confirmed if signed by Microsoft or any prominent firm. But where the publisher is ambiguous, it will be a red alert for you.
Analyzing with VirusTotal
You could also visit and load the file on VirusTotal.com to check its authenticity. The site engages in file service analysis by using 25+ anti-malware engines. Normally, files could get 1 or 2 results of false positives after their analysis. Based on the result of the analysis, confirm the general opinions and comments of people within the VirusTotal community.

How To Fix MoUSO Core Worker Process
Use the following method to prevent MoUSO Core Worker Process from bringing out your system from sleep mode.
Shut Off the Wake Timers
You could turn off the wake timer of your PC to fix the problem of the MoUSOCoreWorker .exe waking the computer from sleep. Use these steps to complete the action.
- Right-click the Start menu and select Power Options.

- Click on Additional Power Settings.

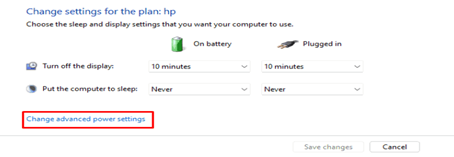
- Click on the ‘Change plan settings’

- Next, click the ‘Change advance power Settings’

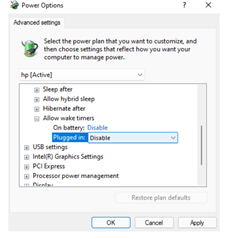
- Click the + icon to expand Sleep. Also, expand the Allow Wake Timers button.
- Change the setting to Disable.

- You should also set the ‘Plugged in’ and ‘On battery’ buttons to ‘Disabled.’
Disable MoUSOCoreWorker.exe in Task Scheduler
Here are the steps to disable the file in Tash Scheduler.
- Type and search for Task Scheduler from the Windows search box.
- In the progressive order, move through Task Scheduler Library – Microsoft – Windows – Install Service.
- From the option of Install Service, right-click and set the following two tasks to Disabled:
- WakeUpAndContinueUpdates
- WakeUpAndScanForUpdates
Run Your Windows Update Troubleshoot
Running your Windows Update Trouble will not necessarily disable the operations of the MoUSOCoreWorker.exe. However, this method will help to fix its activities. Here are the steps to achieve that.
- Simultaneously press the Windows and I This opens the Settings interface of your system.
- Click on the Troubleshoot
- Select the Windows Update

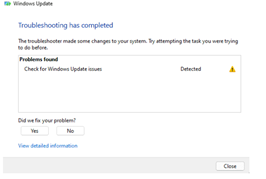
- Click on the Run the troubleshooter button to continue. This causes the Windows Update Troubleshooter to start running.
- Proceed to click on ‘Apply this fix.’ The command automates the troubleshooter to start fixing the system problems which it detects.
- Reboot your PC once the entire process completes.
- Run the Windows update again to ensure all the issues with MoUSOCoreWorker Process are resolved.
Disable the UOS (Update Orchestrator Service)
MoUSO Core Worker Process can only function when the UOS of the system is running. So, by disabling the system’s UOS, the MoUSOCoreWorker.exe will automatically be disabled and stop waking a computer from sleep mode. However, using this method shuts off every Windows Update on your computer. This may not be a favorable option for use.
Here are the steps to achieve that:
- Simultaneously press the Windows and R
- In the box for Open, type msc and click ok.
- From the several displays, look for Update Orchestrator Service and double click on it.

- Select Disabled on the Startup type.

- Then, click the Ok
Use PowerShell to Stop Wake Up Triggers
You can fix the wake-up triggers of the MoUSO Core Worker Process on your system through the use of PowerShell. This will involve ignoring the wake-up calls from the exe file.
Here are steps to achieve that.
- Open the Windows PowerShell by searching for Powershell on the Windows search box.
- Click on Run as Administrator.

- Type in the command: powercfg/requestoverride process MoUSOCoreWorker.exe execution in PowerShell
- Hit the Enter key to perform the command.

Also, you can use the YouTube link below:
Why Does MoUSO MoUSO Core Worker Process Consume High Memory and System Resources?
It’s a normal occurrence for the MoUSO Core Worker Process to take up some of a system’s memory during Windows updates. The value usually ranges between 8MB and below. But there could be situations where the process consumes more Physical memories that could run down the system’s RAM.
Below are some reasons MoUSO Core Worker Process consumes more system memory and other resources.
- Where there are several pending installations and downloads that have queued up during the running Windows Update.
- When your computer gets infected with malicious software.
- If there are cases of unknown errors occurring within the Windows Update Services.
See More: How to Fix Firestick Optimizing Storage Without Professional 2021
Methods to prevent MoUSO Core Worker Process from High Memory Consumption
Usually, once malware infiltrates your system, it could lead to high memory consumption. But you will receive a warning from the Windows Defender even before the malware commences its destructive works.
But when the MoUSO Core Worker Process of your system takes up more memory, there is increased usage of system resources by the components of the Windows update.
Below of some solutions that you could try to fix the issues of high memory consumption from the MoUSOCoreWorker.exe file. Ensure to apply them separately and check for problems before moving to try another one.
Download and Install All Pending Updates
With several pending updates queued, your system’s memory and speed are likely to get lower.
- From the Windows key, get to Settings.
- Navigate through Update & security = Windows update.
- Click on either Install update or Check for updates.

- Restart your PC when the installation
Uninstall Newly Downloaded Updates
In some cases of high memory usage problems, there could be errors with most of the recent Windows Updates. Uninstall them could bring a possible solution.
- Simultaneously press the I and Windows
- Navigate through Update &security = Windows update = Update History.

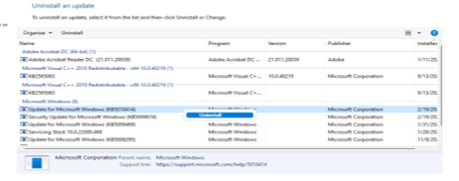
- Select and click on the Uninstall updates

- On the tab of Windows update, right-click.
- Then, click on Uninstall.

Stop All Background Tasks
With the use of the Task Manager, you can stop running the MoUSOCoreWork.exe in the background. But the process would start running again during system updates.
- Simultaneously press Ctrl + Shift + Esc keys to open your Task Manager.
- From Processes, select and click on MoUSO Core Worker Process.
- Then, click the End Task

Run the Windows Update Troubleshooter
Running the Windows Update Troubleshooter will help to identify and correct the possible cause of high memory usage. The steps below apply to Windows 10.
- Simultaneously press the Windows, and I keys to get to Settings.
- Navigate through Update & security = Troubleshoot = Additional Troubleshoot.
- Click on the Run to activate the Windows Update Troubleshooter.
- The Troubleshooter will automatically detect and fix any problem on the system. Also, it will cause some changes based on the fixed issues.

Conclusion
Going through this article brings a clear understanding of the MoUSO Core Worker Process and its function as a Windows Update process. You could now fix the issues associated with running the process in your system’s background or possible usage of high system memories.
